I just sent off two more of my paper pinecone ornaments! I sold them for $10 each, but I should've charge more due to the time it takes. The supplies are not expensive at all---it's just time consuming. If you've never made one, I'll provide the tutorial below. I also have this uploaded to my other blog
A Scrapmom's Musings. They were ordered by a co-worker of my daughter's and she loved them! I'm thinking of making more and uploading them to my Etsy store (which has been sadly neglected).
Here's the other one:

Here is what the top of the ornaments look like:

The above is the top of the red ornament. Below is the top of the green/white one:

Okay, now as promised, here's the tutorial if you're interested.


Materials:
* One (1) 12x12 sheet of patterned paper
* One 3" styrofoam egg
* 18" length of ribbon to match (not shown)
* Dressmakers Pins--also known as bridal or lace pins or even 'common' pins
* Glue Gun
* 12 inch cutter
* Assorted greenery, faux berries, faux pearls, or other embellishments (optional)
1. Start by cutting your pattern paper into 1" strips (1" x 12").


2. Trim those strips into 1 inch pieces. Each piece should measure 1"x1". You will use most, if not all, these pieces depending on how tight you layer your pieces.

3. Next, take your 1 inch squares and fold in the two edges of one side to create a triangle. There should be about a half inch, perhaps slightly less, on the opposite side. I fold all my squares so when I start layering, I'll have plenty.


4. Now you're ready to place these triangles onto the styrofoam egg. Tip the egg so the narrowest part is facing up. Place two triangles with the tips touching at the base and pin in place using the dressmaker pins. You want to place the pins near the very edge and at the corners so they're hidden by the next layer. Next, add two more triangles at the tip to create your first 'row'. See photo below.


5. Continue to layer the pieces, overlapping the triangles as you go around the egg. Make sure you're covering up the pins from the previous row.


6. Keep layering the pieces, as in step 5, and continue in this circular movement until you reach the 'bottom' of the egg, which once decorated is actually the 'top' of the egg, but for layering purposes, I'm calling it the bottom....for now.

This is how it should look:

7. The top might be a bit confusing, but just pin the triangles on until there isn't any white showing. Don't worry about the pins being exposed on the top--these will be covered up by the ribbon and embellishments.

8. Cut your length of ribbon into one 8 inch piece and two 5 inch pieces.
9. Make a large loop using the 8 inch piece and pin the ends to the center of the egg as shown. This is the loop that will be used to hang the ornament.
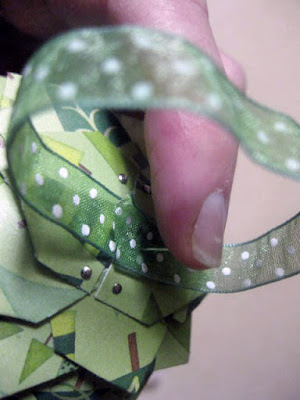
10. Make 2 smaller loops with the 5 inch pieces, criss-crossing them in the center of the loop and pinning in place.

11. Using the glue gun, add your greenery, faux berries, and other embellishments if you choose. I do this because I think it adds more elegance to the ornament. Have fun with creating your ornament and make it as personal as you like. Put your personality into it.

Here is an example of the finished ornament:

I plan on uploading more crafty tutorials as time allows. I should have another posted over the weekend, or beginning of next week. I need time to get the project done in order to photograph it in steps. Thanks for understanding.
Enjoy!