Pages

Sunday, August 22, 2010

Okay, Enough of Ignoring This Blog

I have been so neglectful of this blog because I'm giving so much of my time and energy to my Scrapmom's Musings Blog. I was considering putting everything into one blog, but felt it would be too overwhelming. Oh well. So.....today I vow to keep this blog updated at least on a weekly basis with things such as recipes, crafts, and living my life in Maine. I hope you'll come back often and enjoy what I'll be offering. Thanks!

So, where to start? I think I'll share some of my yard sale finds.

This is a dresser that I picked up for $3.00!!  I need to repaint it, but I might keep it white.  I'd like to add some flowers or something to it.  Not sure yet. 
This is a wooden shelf and a metal "thinga-ma-jig" that I'll use somewhere in the house.  I always buy stuff when it strikes my fancy, bring it home and then wonder what I'm going to do with it!  I think the wooden unit will go in the kitchen.  I'm not sure if I'll keep it as is or paint it.  I collect all kinds of country goodies, so I'll use this to display them.
And the item below I bought for a $1.00 and plan on keeping this in my scrap room.  The items inside were also purchased at the yard sale.  I like it as is as my scrap room has a Rose theme. 


This will be used to display little odds n ends that appeal to me.  They might not be scrap-related--just things that make me smile.

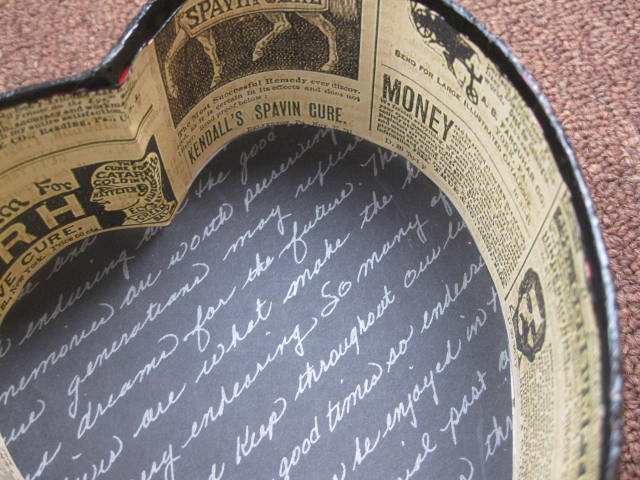
And this is an old jewelry box that I thought would be perfect on my work table in my scraproom to hold small embellishments.  I definitely have to change the color! 

Thanks for looking and come back soon!

Wednesday, May 19, 2010

Sorry I haven't posted

I'm doing my best to post on both blogs--this one and A Scrapmom's Musings. I've been blog hopping---again---and have discovered some more great blogs! I just found The Thrifty Home and grabbed her button. Check her out--she has a wonderful blog! I also found Hope Studios. Still blogging along in search of some more great blogs.

Anyway, today is quite rainy and a great day to stay inside, but I have to go to work later. The last 2 days were gorgeous and I spent them planting my flowers. I still have a few more to plant, but 80% of it is done. I'm a bit nervous though that they'll survive the next 2 weeks as we still have a chance of getting another freeze. My fingers are crossed. Wish my flowers luck!

I'm also preparing for uploading some more crafty stuff. I'll post when they're completed. For now, I thank you for stopping by. Have a wonderful Wednesday!

Saturday, May 8, 2010

My Creations from the last few months

I haven't done any crafting since Christmas. I've been scrapping and creating mini albums--a new obsession of mine. I belong to the TWS (Trade Wind Scrappers) on Life on the (Scrap) Beach and we swap a mini album that we've created with a swap partner. I've been involved for 4 months now and love it! Here's a pic of my mini's.....so far.
Above is the album I created for Dawn Edwards for the month of February. The theme, of course, was Love.
This is the album I made for Charlene Gibson for the month of March. The theme was "What makes me happy".
The above is the most recent mini I finished for Pat in the UK. The flowers on the this cover were created by me, except for 3 of the 'flatter' ones, which I believe are Primas.
This is a paper rose that I made a month or so ago--so easy to do!
Here's an altered box that I made for a swap in February. Below is the inside of the box:

This is a toilet paper roll mini album for the Go Green swap over at Scrapper's Delight back in March. This was made entirely from scraps and of paper and packaging materials as well as odds n ends found around the house.

That's about it for now. I'll be working on other items, so check back!

Friday, April 2, 2010

How Could I Be So Neglectful?!

I have been so busy with my blog, A Scrapmom's Musings, that this blog has gone by the wayside. I just haven't done any other type of crafting other than scrapping, so I've just ignored this blog. The beginning of February found me becoming a DT member to two sites: Scrapbooking and Crafting Friends and Creative Scrapbooking Divas. There's alot to do on both sites and I've just been busy!

I will do my best to keep up with this blog. As a matter of fact, I'm just putting the finishing touches on an Easter Basket that can actually be used for birthdays, Mother's Day, Father's Day, Graduation, baby showers, bridal showers, etc. just by changing the paper! I'll post the finished project within the next few days.

So, that's about it for now. If you want to see what I've been up to, hop on over to A Scrapmom's Musings.

Have a Wonderful Easter Weekend!

Thursday, January 21, 2010

I've been neglecting this blog

Sorry I haven't been here. I've been so busy updating my scrapping blog and just creating for challenges, swaps as well as making layouts for DT challenges, that I've sadly neglected this blog. I haven't really been crafting since Christmas. I did find some interesting blogs that I listed to the right but that's about it. I'm going to be creating a lovely gift for a Valentine swap and will post that as soon as it's complete.

Keep Creating!

Wednesday, January 6, 2010

I Sold Two More Pinecone Ornaments!


I just sent off two more of my paper pinecone ornaments! I sold them for $10 each, but I should've charge more due to the time it takes. The supplies are not expensive at all---it's just time consuming. If you've never made one, I'll provide the tutorial below. I also have this uploaded to my other blog A Scrapmom's Musings. They were ordered by a co-worker of my daughter's and she loved them! I'm thinking of making more and uploading them to my Etsy store (which has been sadly neglected).

Here's the other one:
Here is what the top of the ornaments look like:
The above is the top of the red ornament. Below is the top of the green/white one:

Okay, now as promised, here's the tutorial if you're interested.


Materials:
* One (1) 12x12 sheet of patterned paper
* One 3" styrofoam egg
* 18" length of ribbon to match (not shown)
* Dressmakers Pins--also known as bridal or lace pins or even 'common' pins
* Glue Gun
* 12 inch cutter
* Assorted greenery, faux berries, faux pearls, or other embellishments (optional)

1. Start by cutting your pattern paper into 1" strips (1" x 12").


2. Trim those strips into 1 inch pieces. Each piece should measure 1"x1". You will use most, if not all, these pieces depending on how tight you layer your pieces.

3. Next, take your 1 inch squares and fold in the two edges of one side to create a triangle. There should be about a half inch, perhaps slightly less, on the opposite side. I fold all my squares so when I start layering, I'll have plenty.


4. Now you're ready to place these triangles onto the styrofoam egg. Tip the egg so the narrowest part is facing up. Place two triangles with the tips touching at the base and pin in place using the dressmaker pins. You want to place the pins near the very edge and at the corners so they're hidden by the next layer. Next, add two more triangles at the tip to create your first 'row'. See photo below.


5. Continue to layer the pieces, overlapping the triangles as you go around the egg. Make sure you're covering up the pins from the previous row.


6. Keep layering the pieces, as in step 5, and continue in this circular movement until you reach the 'bottom' of the egg, which once decorated is actually the 'top' of the egg, but for layering purposes, I'm calling it the bottom....for now.

This is how it should look:

7. The top might be a bit confusing, but just pin the triangles on until there isn't any white showing. Don't worry about the pins being exposed on the top--these will be covered up by the ribbon and embellishments.

8. Cut your length of ribbon into one 8 inch piece and two 5 inch pieces.

9. Make a large loop using the 8 inch piece and pin the ends to the center of the egg as shown. This is the loop that will be used to hang the ornament.
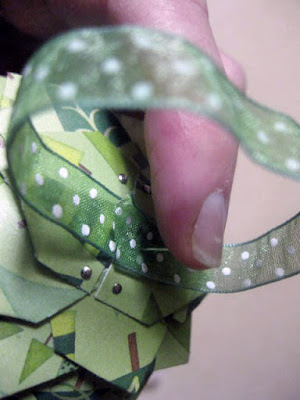
10. Make 2 smaller loops with the 5 inch pieces, criss-crossing them in the center of the loop and pinning in place.

11. Using the glue gun, add your greenery, faux berries, and other embellishments if you choose. I do this because I think it adds more elegance to the ornament. Have fun with creating your ornament and make it as personal as you like. Put your personality into it.

Here is an example of the finished ornament:
I plan on uploading more crafty tutorials as time allows. I should have another posted over the weekend, or beginning of next week. I need time to get the project done in order to photograph it in steps. Thanks for understanding.

Enjoy!
Friday, January 1, 2010

HAPPY NEW YEAR!

I'm wishing all of my followers and visitors and very Happy New Year! May it find you healthier, happier and prosperous. I'm not one to make resolutions because I always feel guilty if I don't follow through, but I have made some 'plans' for the upcoming year.

One plan is start uploading more craft tutorials on this blog because, afterall, that's what this blog is all about. So, if I'm not here for a few days, it's because I'm creating and looking for great crafts to share with you.

I'm heading off to work today but for the most part, my morning will be spent taking down the tree. It's a melancholy experience and as I pack the ornaments away, I think back to the day I unwrapped them to hang on the tree several weeks before. But, I'm also looking forward to having my house back to where it was and getting back into my usual routine.

So, my friends, again I wish you a Happy New Year!